All the code snippets in this article are available in my repo: Github: Saaaaaad3
In this article, we will refer to the fundamentals of Java to learn about data structure as java seems to be one of the most popular languages when it comes to learning about data structures.
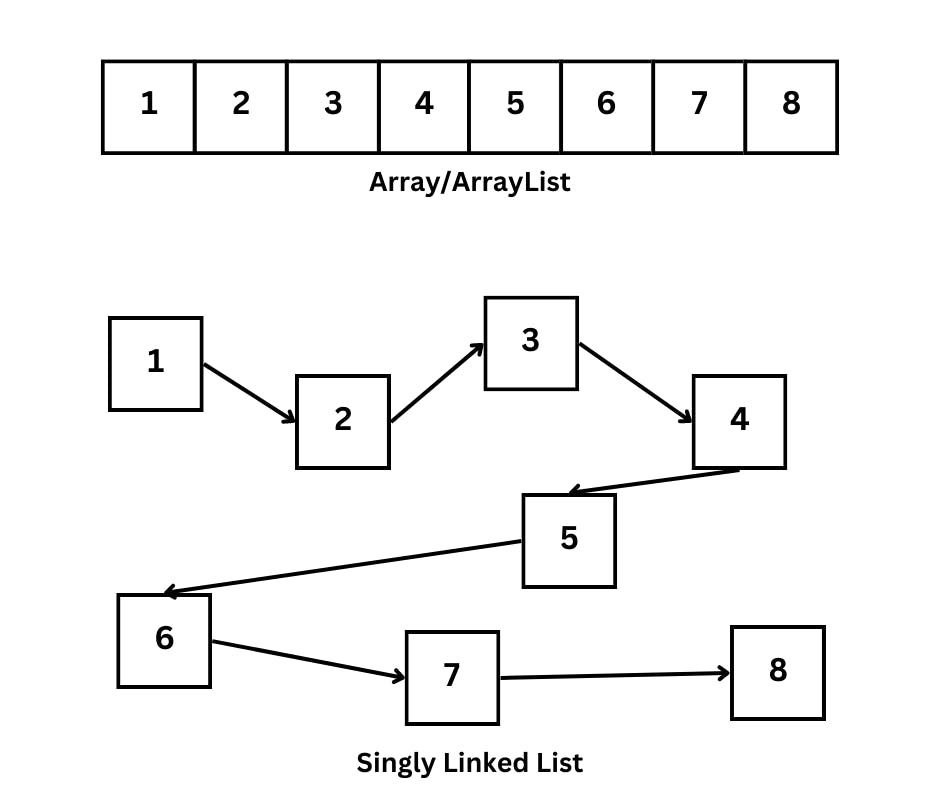
Linked Lists are somewhat like Array Lists in java or a vector in C++. But unlike Array Lists, linked lists are non-contiguous, meaning, the elements are not in adjacent memory locations.
Node Dissected!
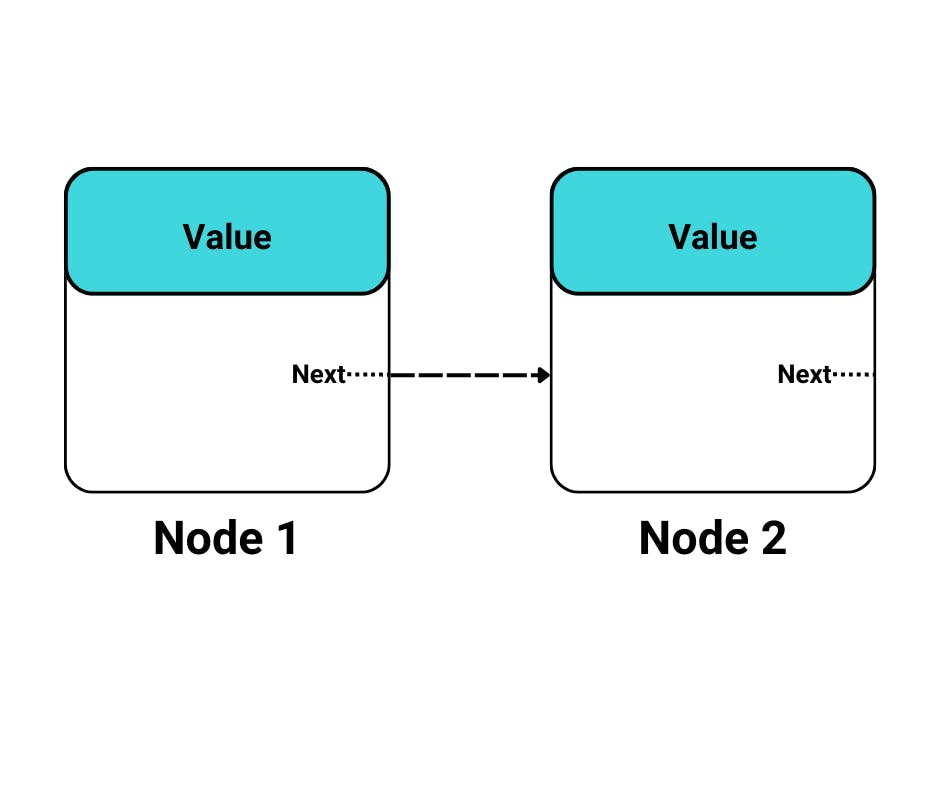
Until now, we know that linked Lists are non-contiguous and linked through ‘node pointers’ and a value is contained in a container known as a node.
‘Multiple nodes linked to each other makes a linked list
There are three types of linked lists,
Singly Linked List
Doubly Linked List
Circular Linked List
In this article, we will look into the Singly Linked List.
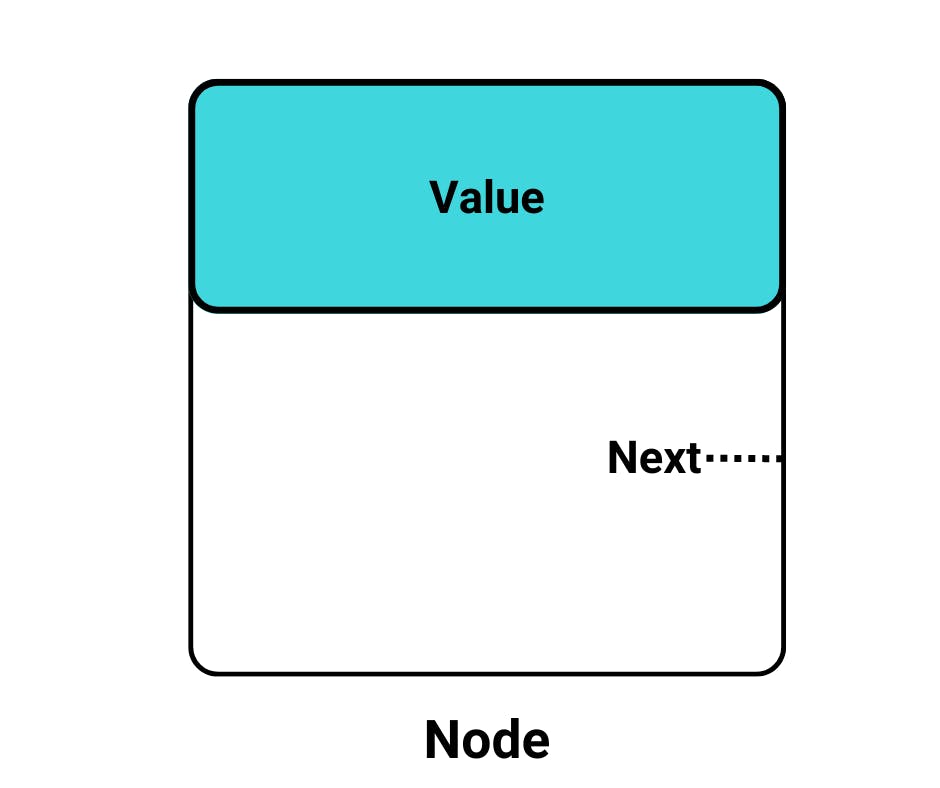
From the image, we can see that a node of a singly linked list, contains:
Value: The value which needs to be stored like an integer, string, decimal, custom data type, etc.
Next: Refers to the node which is connected/points to another node.
Birth of a NODE!
First things first, let's make a Node that will contain the value(integer/string/decimal/object) and the next pointer to point to a different node.
For the sake of simplicity, let's name our node, ‘ListNode’.
public class ListNode {
    private int value;
    private ListNode next;
}
Our node is ready, it can now hold the value and next pointer. But we still need to initialize it, this can be done with the help of constructors.
We can certainly use a default constructor but let's use some common sense here, if we are defining a node, we will almost always have to store a value in it. The cases where we will have to make a node with no values in it are very rare.
To do so, we will add a constructor in our ListNode class which takes the value as a parameter.
public class ListNode {

    private int value;
    private ListNode next;

    private ListNode(int value) {
            this.value = value;
    }
}
Since our node structure is ready, we can go ahead and make two of the most useful nodes for the linked list structure.
Head: The starting node of a linked list.
Tail: The Last Node of a linked List.
The initial value of the Head and Tail, when defined, will be null.

This next step is not mandatory but highly recommended as it will be of much use and save you from the hassle as this custom data structure grows.
Along with the head and tail nodes, we can add one more property in our class, size, of the integer type.
As the name suggests, it will be useful for tracking and storing the size of our list.
Put all of this in a parent class, to conveniently group them all up.
Don’t forget to initialize the size as 0 in the constructor of our parent class,
The name of the parent class is ‘SinglyLinkedList
public class SinglyLinkedLists {
    private int size;
    private ListNode head;
    private ListNode tail;

    public SinglyLinkedLists() {
        size = 0;
    }

    public class ListNode {
        private int value;
        private ListNode next;

        private ListNode(int value) {
            this.value = value;
        }
    }
}
Our basic class for Singly Linked List is done!
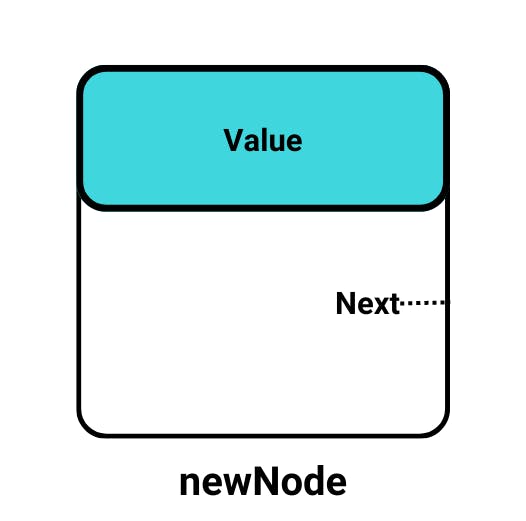
To create a node, we can make an object of our class and from that object, call the constructor with value.
ListNode newNode = new ListNode(value);
Basic functions ahead, Go slow!
Now that we know how to define and initialize a node, the next step is to understand how one can make a function for displaying the node values and inserting a new node in the list
Display Function
Time Complexity: O(n) Where n is the length of the list
Before we move ahead and learn about the functions, it is crucial to learn how one can traverse the list. In an array or array list, we use index-based traversals, meaning we use indexes to access the element present at that index.
This is only possible due to their contiguous nature, but as we already know, this is not the case for linked lists.
That is the whole reason why we have a dedicated pointer(Next).
Let’s say for example we have an integer linked list storing numbers from 1 to 7.
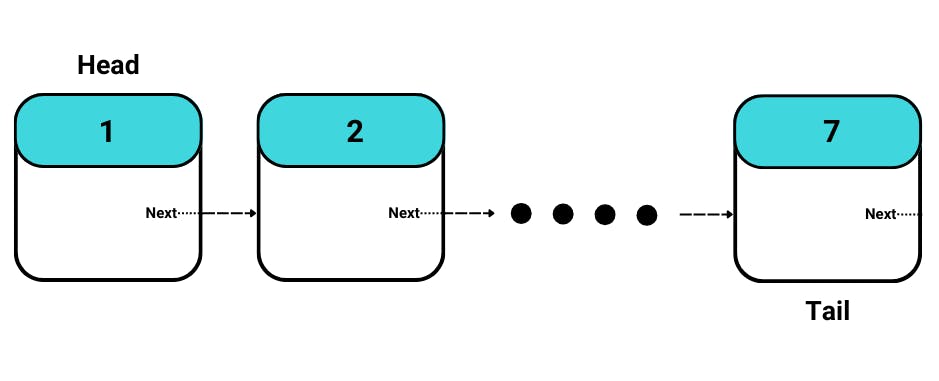
We need to traverse from 1 to 7.
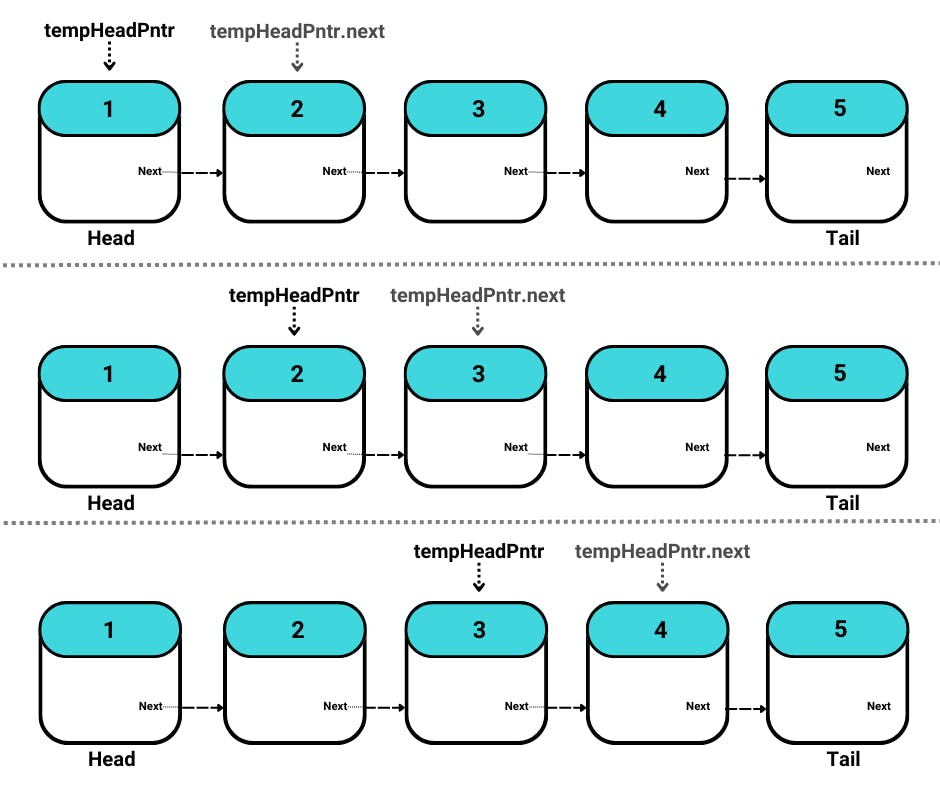
Further on, we will learn that the head plays a crucial part in many functions and the structure of the list heavily depends on the head node. There we will not use the actual head for traversal as it will modify the whole list.
So, we will use a duplicate of the head which will avoid any modification of the existing list.
First, we need to check if the head is null or not. An empty head means the list is empty.
Then create a tempHeadPntr node (you may name it anything you like)
if (head == null) {
    System.out.println("List is Empty!");
    return;
}
ListNode tempHeadPntr = head;
tempHeadPntr.next refers to the node which is next in our list.
We then assign tempHeadPntr to tempHeadPntr.next
This is done till the tempHeadPntr encounters a null.
public void Display(){
    ListNode tempHead = head;

    while(tempHead != null){
        System.out.print(tempHead.value + "->");
        tempHead = tempHead.next;
    }
    System.out.println("End");
}
String concatenations and ‘System.out.println’ are for ease of readability at the result.
First come, First served
Time Complexity: O(1) [Constant]
Even though, the one we use the most for insertion is the one which allows us to insert the node at the end of the list.
However, to highlight the importance of setting Head, we will first look into the function which allows us to insert the node at the start of the list, we will name this function ’insertFirst’.
If we want to enter a node, the very first step would be to create one.
No node, no entering. Common sense.
ListNode newNode = new ListNode(value);
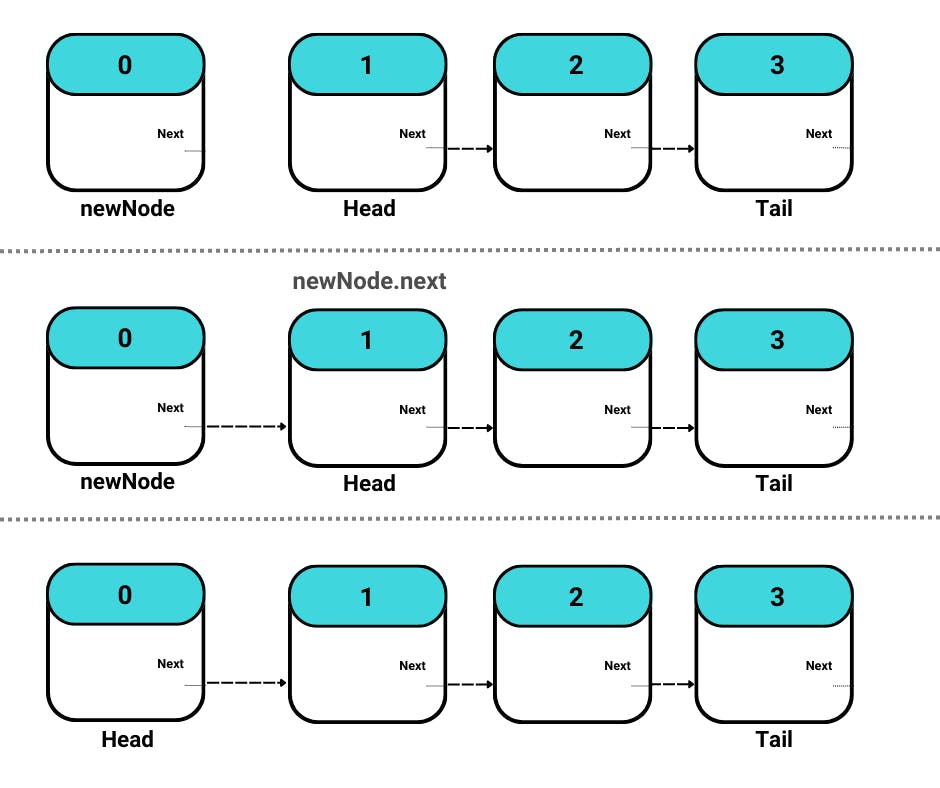
Since we are entering this newNode at the start of the list, this means this newNode will be the Head node of our list.
If the list is empty or the head node is null, we can simply declare newNode as head and since we are adding a node to the list, we will increase the size by 1.
if (head == null) {
    head = newNode;
    head.next = null;
    size++;
    return;
}
If the list is not empty or the head is not null, we will have to execute 2 steps to avoid any loss of nodes
Point the NEXT of newNode to head.
Declare the newNode as head.
public void insertFirst(int value) {
    ListNode newNode = new ListNode(value);

    if (head == null) {
        head = newNode;
        tail = head;
        head.next = null;
        size++;
        return;
    }

    newNode.next = head;
    head = newNode;
    size++;
}
Last is not Least!
Time Complexity: O(1) [Constant]
We use insertLast function to enter the value at the end of the list.
At the beginning of a function, we make the same check as we did in the previous function, checking if the list is empty or not by checking if the head is null or not null.
If the list is empty, simply call the insertFirst function, this will make a new node and assign it as the head.
This is why it was important to create insertFirst function before moving ahead with this one.
if (head == null) {
    insertFirst(value);
    return;
}
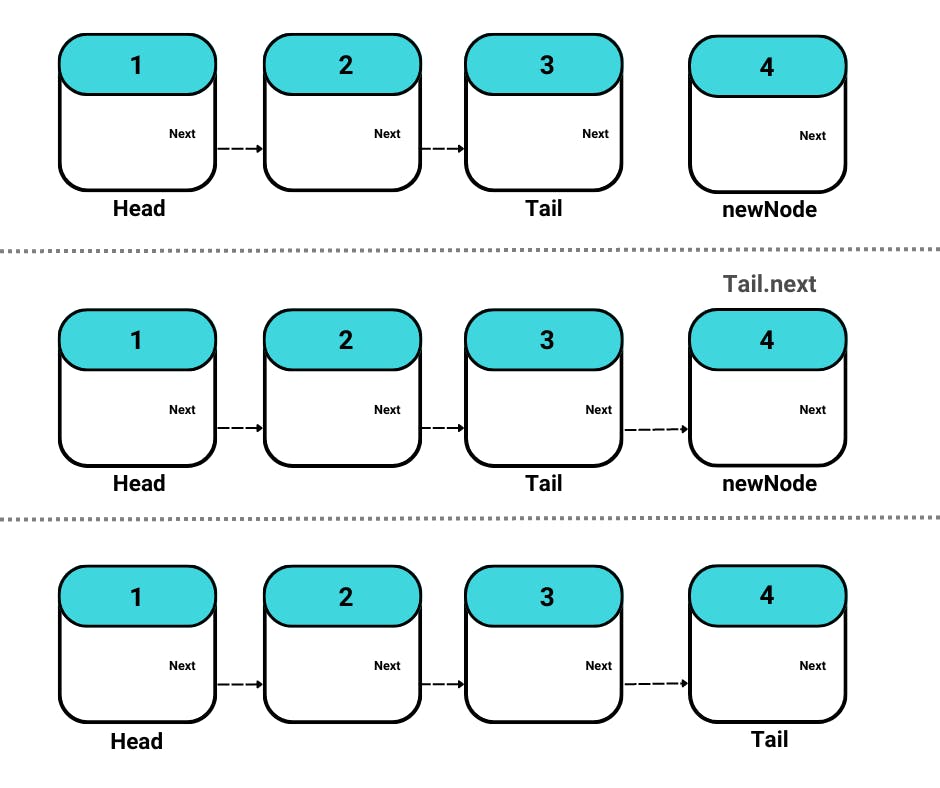
If the head is not null then we can go ahead and check if the tail is properly set or not, in simple words, the tail node is null or not.
As the condition passes, all we have to do is assign null to newNode.next
Point the current tail node’s next pointer to our newNode.
Then finally declare our newNode as the tail.
public void insertLast(int num) {
    ListNode newNode = new ListNode(num);

    if(head == null){
        insertFirst(num);
        return;
    }

    if(tail != null){
        newNode.next = null;
        tail.next = newNode;
        tail = newNode;
        size++;
    }
}
Deleting by value
Time Complexity: O(n) Where n is the length of the list.
There are different ways to delete a node, and in accordance with them, we can make functions like DeleteFirst, DeleteLast, DeleteByIndex, DeleteByValue, etc.
In this article we will go over the basic function, DeleteByValue;
Just like we did in our Display function, we will first check for an empty List
if (head == null) {
    System.out.println("List is Empty");
    return;
}
Next, check if the value we want to delete is of head node. If it is, just declare the node which comes after the head as Head node.
if (head.value == value) {
    head = head.next;
    size--;
}
If it is not a head node value, and the list is not null, we can iterate over the list and check for the needed value one by one.
Make a duplicate head node, tempHead in order to avoid any modifications.
Run a while loop till tempHead encounters a null
Keep checking if the value of next node of tempHead is the same as the value we need to be deleted.
If found, simply assign the next pointer of tempHead to be the next of next node, this is done by tempHead.next.next.
public void DeleteByValue(int value) {
        if (head == null) {
            System.out.println("List is Empty");
            return;
        }
        if (head.value == value) {
            head = head.next;
            size--;
            return;
        }

        ListNode tempHead = head;
        while (tempHead != null && tempHead.next != null){
            if(tempHead.next.value == value){
                tempHead.next = tempHead.next.next;
                size--;
                return;
            }
            tempHead = tempHead.next;
        }
    }
While referring to this function, other functions for deletion can be easily made. This can be a little exercise for you guys to try something on yourselves!
A little hint about indexing is, we can use the Size property which we have been using from the very start.
All the code snippets in this article are available in my repo: Github: Saaaaaad3
