All the code snippets in this article are available in my repo: Github: Saaaaaad3
In this article, we will refer to the fundamentals of Java to learn about data structure as java seems to be one of the most popular languages when it comes to learning about data structures.
Prerequisites:
Singly Linked Lists (https://bigsmallbyte.hashnode.dev/singly-linked-list)
Getting Started
Doubly linked lists are very similar to singly linked lists the only area where they differ from each other is at the ‘pointers’.
As already stated in my previous article on singly linked lists, we have a pointer, which we named ‘Next’, it points to the node which is next in the sequence. The limitation in the singly linked lists was that we could not traverse backward as we only had a next pointer.
However, doubly linked lists eliminate this limitation as it introduces a second pointer, named ‘Prev’, short for Previous. Just like next points to the next node in the sequence, prev points to the node which was previous to our current node.
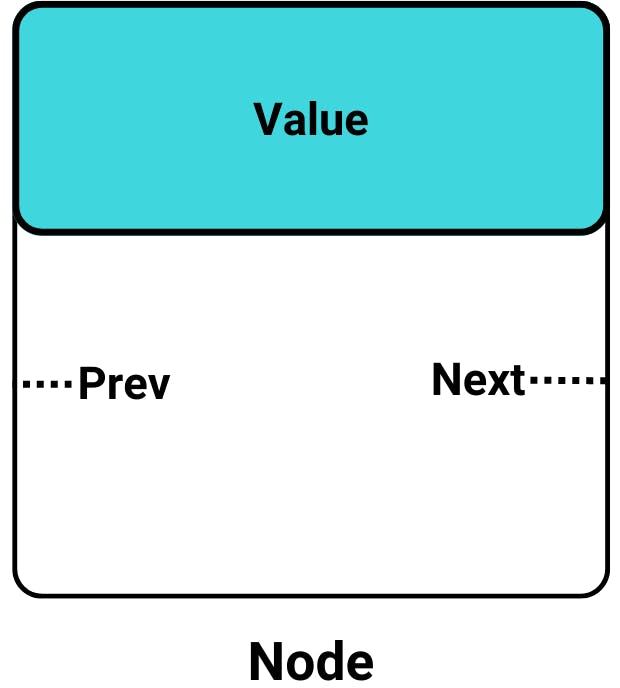
This opens up new possibilities, even though the functions for both types may look similar, there is an important logic we must take care of to form the structure properly.
Display Function, but reversed!
If you have seen my previous article on singly linked lists, you must have noticed that if you’re making a new linked list, and entering the node either from the front or the back, the tail will get set and there’s no way to avoid that.
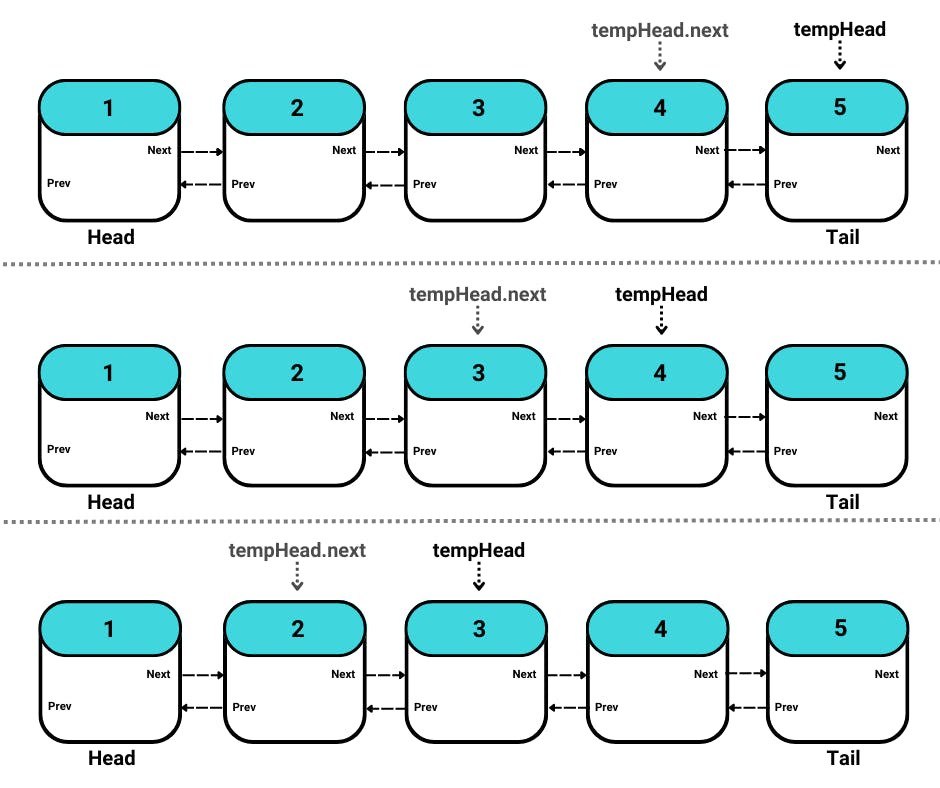
Setting a tail makes it much easier to traverse in reverse. We can simply check if the list is empty or not by checking if the tail is null or not.
If the tail is not null we can declare a tempHead node and assign our tail node to it. From there, we can use the prev pointer to traverse till we hit null (prev of head node).
public void DisplayReverse(){
    if(tail == null){
        System.out.println("List is Empty");
    }

    ListNode tempHead = tail;

    while(tempHead != null){
        System.out.print(tempHead.value + "->");
        tempHead = tempHead.prev;
    }
    System.out.println("End");
}
Inserting from start!
Very similar to the insertFirst function in the previous article, but here we need to ensure that along with insertion, we are also actively setting the prev pointer.
Make a new node with the value to be inserted.
Check If the head is null, it is, declare the new node as head.
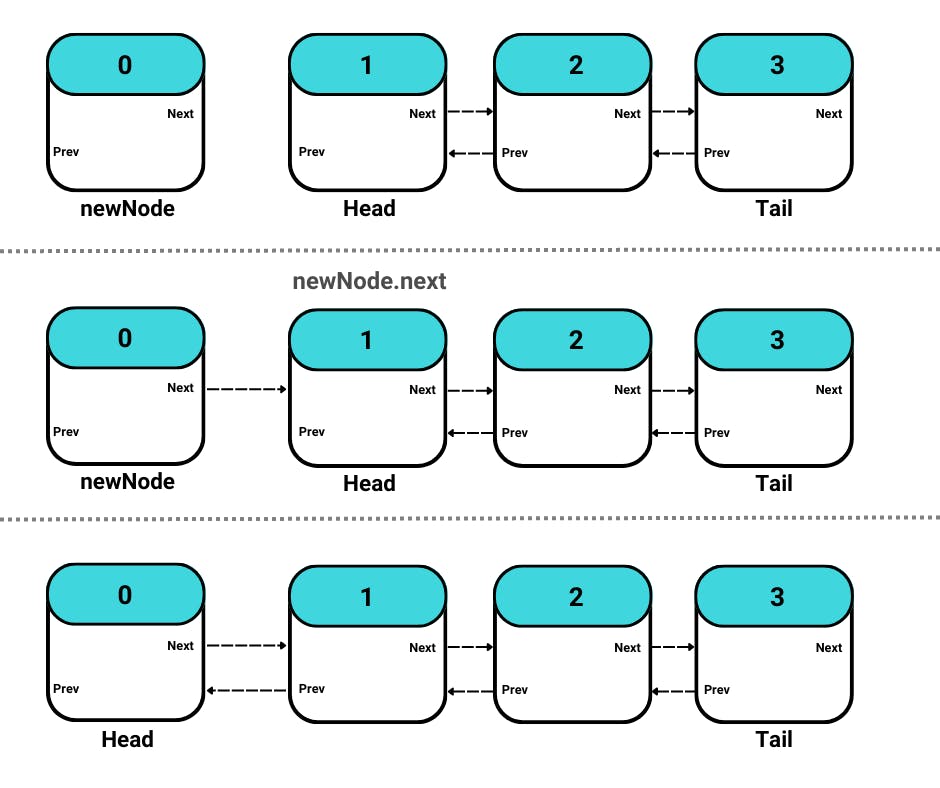
Point the new node’s next to the head.
Make the new node, the head node’s prev. This solidifies the place of the new node.
Now that the gap has been filled, declare the new node as the head and assign the prev of head as null as it’s supposed to be.
public void insertFirst(int num){
    ListNode node = new ListNode(num);

    if(head == null){
        head = node;
        tail = node;
        size--;
        return;
    }
    node.next = head;
    head.prev = node;
    head = node;
    head.prev = null;

    size++;
}
Inserting at Last!
Check to see if the head is null, it is, it indicates that the list is empty, in this case, we can simply call the insertFirst() function that we wrote above.
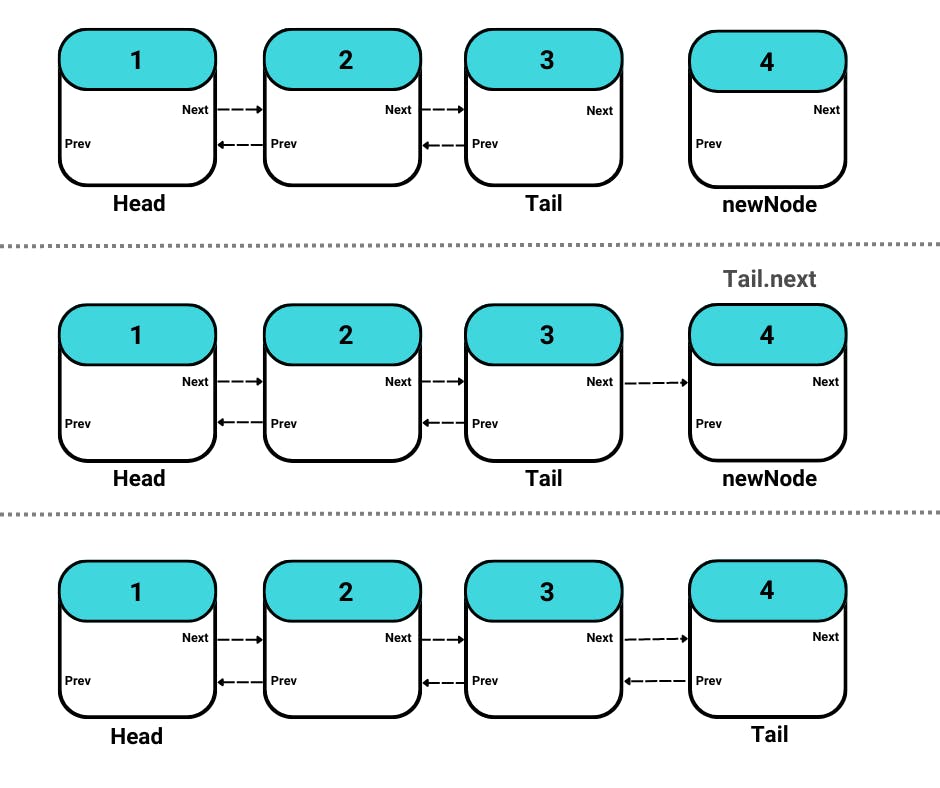
Make a new node with the value to be inserted.
Point the new node’s prev to the tail, this puts our new node at the end of the list.
Point the next tail node to our ‘node’. This solidifies the position of our new node at the last.
Finally, assign null to the next of our new node and declare it as the tail.
public void insertLast(int num) {
    ListNode node = new ListNode(num);
    if(head == null){
        insertFirst(num);
        return;
    }
    if(tail != null){
        node.prev = tail;
        tail.next = node;
        node.next = null;
        tail = node;
    }
    size++;
}
Deleting the Head or Tail nodes
Delete functions for DeleteFirst and DeleteLast are the same and the easiest ones as you only have to check if they are null and re-declare the head or tail node respectively.
public void DeleteFirst(){
    if(head == null){
        System.out.println("The List is Empty");
        return;
    }
    head = head.next;
    size--;
}
In DeleteLast, instead of traversing the whole function, we can use the prev pointer to re-declare the tail node.
public void DeleteLast(){
    if(tail == null){
        System.out.println("The List is Empty");
        return;
    }
    tail = tail.prev;
    size--;
}
Deleting the node based on Value
We will run a do-while loop and in each iteration, we will compare the ‘num’ from the value of tempHead.
If the above condition is true, we and our tempHead is the same as the head then we can call DeleteFirst function. The same applies to the case where tempHead is the same as the tail node, we can call the DeleteLast function.
If the above two cases are false and we encounter the node with the value to be deleted in the middle of the sequence, meaning tempHead.value == num.
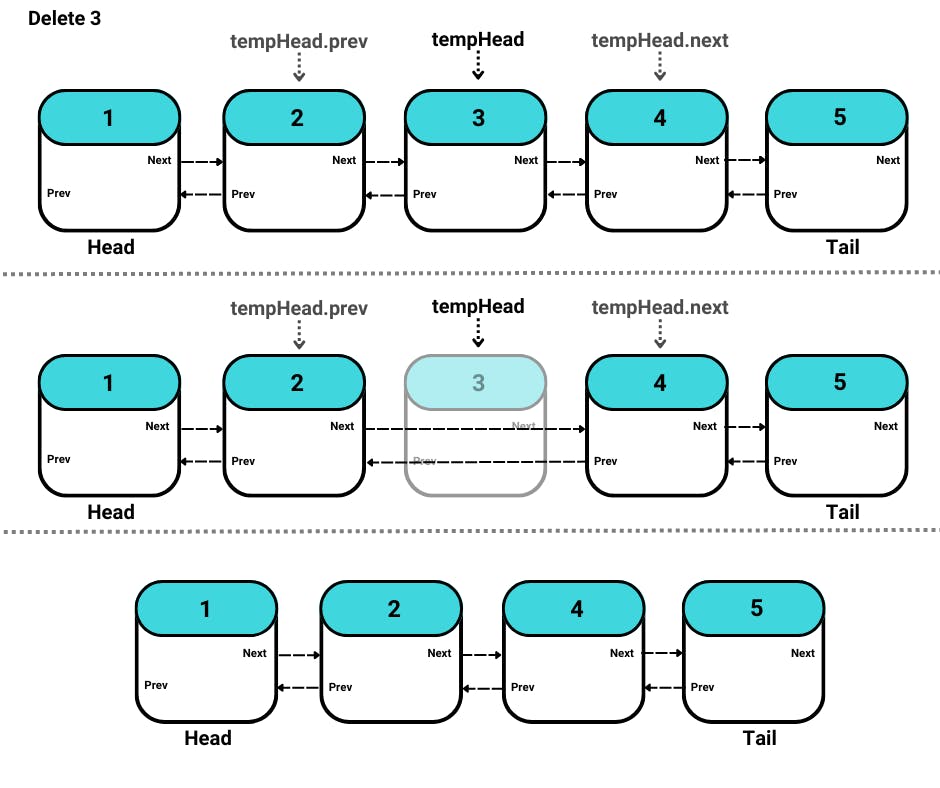
We can assign,
the Next of the prev of tempHead to the next of tempHead and
the Prev of the next of tempHead to the prev of tempHead. (vice versa).
public void Delete(int num){
    if(head == null){
        System.out.println("The List is Empty");
    }
    ListNode tempHead = head;

    do{
        if(tempHead.value == num){
            if(tempHead == head){
                DeleteFirst();
                size--;
                return;
            }
            if(tempHead == tail){
                DeleteLast();
                size--;
                return;
            }
            tempHead.prev.next = tempHead.next;
            tempHead.next.prev = tempHead.prev;
        }
        tempHead = tempHead.next;
    }
    while(tempHead != null);
    size--;
}
This pretty much sums up the basics one needs to know to get started with a doubly linked list. You can make your functions or improve the ones mentioned in the article!
Coming up next, we will look into circular linked lists!
All the code snippets in this article are available in my repo: Github: Saaaaaad3
